安装MiniProfiler
- Install-Package MiniProfiler.AspNetCore.Mvc
在startup.cs 中配置服务ConfigureServices
services.AddMiniProfiler(options =>{options.RouteBasePath = "/profiler";//注意这个路径要和下边 index.html 脚本配置中的一致,(options.Storage as MemoryCacheStorage).CacheDuration = TimeSpan.FromMinutes(10);}
最后,调用下中间件即可:
app.UseMiniProfiler();
在 Swagger 中配置 MiniProfiler


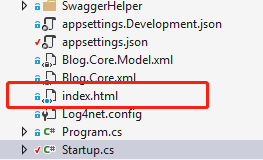
下载最新的 index.html
Index.html
<script async="async" id="mini-profiler" src="/profiler/includes.min.js?v=4.0.138+gcc91adf599"data-version="4.0.138+gcc91adf599" data-path="/profiler/"data-current-id="4ec7c742-49d4-4eaf-8281-3c1e0efa748a" data-ids="" data-position="Left"data-authorized="true" data-max-traces="15" data-toggle-shortcut="Alt+P"data-trivial-milliseconds="2.0" data-ignored-duplicate-execute-types="Open,OpenAsync,Close,CloseAsync"></script><!-- HTML for static distribution bundle build --><!DOCTYPE html><html lang="en"><head><meta charset="UTF-8">................
具体的参数请自行研究吧,基本都能看懂,比如版本,
/profiler的路径,position的位置显示(我是左边),authorized的是否权限,max-traces最多显示多少条(15)等等。然后我们修改下中间件去调用我们这个 index.html 页面:
app.UseSwaggerUI(c =>{typeof(ApiVersions).GetEnumNames().OrderByDescending(e => e).ToList().ForEach(version =>{c.SwaggerEndpoint($"/swagger/{version}/swagger.json", $"{ApiName} {version}");});// 将swagger首页,设置成我们自定义的页面,记得这个字符串的写法:程序集名.index.htmlc.IndexStream = () => GetType().GetTypeInfo().Assembly.GetManifestResourceStream("Blog.Core.index.html");});
- 最后,记得一定要配置了使用静态资源文件的中间件:
app.UseStaticFiles();
在接口中使用 MiniProfiler
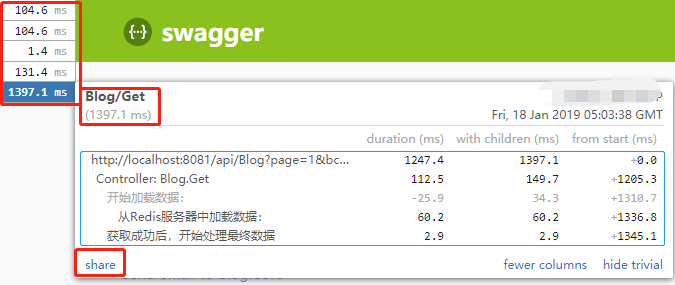
public async Task<object> Get(int id, int page = 1, string bcategory = "技术博文"){ ......// 你可以用这种包括的形式using (MiniProfiler.Current.Step("开始加载数据:")){if (redisCacheManager.Get<object>("Redis.Blog") != null){// 也可以直接这么写MiniProfiler.Current.Step("从Redis服务器中加载数据:");blogArticleList = redisCacheManager.Get<List<BlogArticle>>("Redis.Blog");}else{MiniProfiler.Current.Step("从MSSQL服务器中加载数据:");blogArticleList = await blogArticleServices.Query(a => a.bcategory == bcategory);redisCacheManager.Set("Redis.Blog", blogArticleList, TimeSpan.FromHours(2));}}......}

切面 MiniFilter 分析
- 很简单,只需要在 AOP 日志记录中,配置 MiniProfiler 即可
try{// 就是这里!!MiniProfiler.Current.Step($"执行Service方法:{invocation.Method.Name}() -> ");invocation.Proceed();}catch (Exception e){//执行的 service 中,捕获异常dataIntercept += ($"方法执行中出现异常:{e.Message + e.InnerException}");}
在Swagger中展示 Sql 执行日志
如果想要开启这个 SQL AOP的功能,请参考我的源代码,主要是通过 SqlSugar 的 相关功能来实现,发现主分支,已经没有了 DbContext 上下文了,因为目前我采用了事务工作单元的形式,所以不用上下文来处理了,统一使用 ISqlsugarClient 的形式了,最新版的Sqlsugar也可以通过注入的形式,直接把AOP给配置进去,
- 查看 SqlsugarSetup.cs 类:
BaseDBConfig.MutiConnectionString.Item1.ForEach(m =>{listConfig.Add(new ConnectionConfig(){ConfigId = m.ConnId.ObjToString().ToLower(),ConnectionString = m.Connection,DbType = (DbType)m.DbType,IsAutoCloseConnection = true,IsShardSameThread = false,AopEvents = new AopEvents{OnLogExecuting = (sql, p) =>{if (Appsettings.app(new string[] { "AppSettings", "SqlAOP", "Enabled" }).ObjToBool()){Parallel.For(0, 1, e =>{MiniProfiler.Current.CustomTiming("SQL:", GetParas(p) + "【SQL语句】:" + sql);LogLock.OutSql2Log("SqlLog", new string[] { GetParas(p), "【SQL语句】:" + sql });});}}},MoreSettings = new ConnMoreSettings(){IsAutoRemoveDataCache = true},// 从库SlaveConnectionConfigs = listConfig_Slave,//InitKeyType = InitKeyType.SystemTable});});
结合AOP+MiniProfiler实现异常可视化
// 这个是AOP中try{MiniProfiler.Current.Step($"执行Service方法:{invocation.Method.Name}() -> ");invocation.Proceed();}catch (Exception e){//执行的 service 中,收录异常MiniProfiler.Current.CustomTiming("Errors:", e.Message);//执行的 service 中,捕获异常dataIntercept += ($"方法执行中出现异常:{e.Message + e.InnerException}");}//这个是全局异常处理中public void OnException(ExceptionContext context){//...................不重要内容...............MiniProfiler.Current.CustomTiming("Errors:", json.Message);//采用log4net 进行错误日志记录_loggerHelper.Error(json.Message, WriteLog(json.Message, context.Exception));}

